Wednesday, August 17, 2011

Happy Obsessions

 I love unhealthy happy obsessions. Recently I've become obsessed with pies. This happy moment began when I indulged in some blueberry pie from Pioneer Pies. If you ever have the unfortunate opportunity of visiting Oklahoma, then I suggest drowning your sorrows in some comfort food from here. I recommend taking the pie, hiding in the safe spot, being armed with a spoon, and digging in.

After consuming enough pies a little wheel turned in my head and I wondered, 'How hard could it be to make heaven on a plate?'. I searched the interwebs long and hard, I oogled at all the recipes on FoodGawker, and drooled all over my keyboard. Finally, I came across this amazing recipe and thought, 'I've found the one!,' and asked the fancy man if he could get a list of ingredients.

By Sunday, I was armed with more blueberries than you can throw at the aggressive geese at our apartment complex. I altered the original recipe because I'm too lazy to follow directions and because the fancy man got the wrong crusts. This meant I had to get creative but you can alter the recipe according to your convenience by use your own pie dish and the fancy rolled up pie crusts.

This recipe will make 2 pies.

Things you may or may not need:

Crust
- 2 sets of frozen pie crusts (Each set contains 2 pie crusts in disposable pie containers)

Glaze
- 1 large egg yolk
- 1/4 tsp cooking oil.

Filling a.k.a. food drug
- 4 pints fresh blueberries
- 1 1/4 cup granulated sugar
- 3/4 cup raw brown sugar
- 1/2 cup instant tapioca
- 3 tbsp cornstarch
- 3 tbsp unsalted butter
- 2 tbsp lemon juice
- 2 tbsp vanilla essence
- 1 tsp ground cinnamon
- 1/4 tsp ground nutmeg
- 1/4 tsp salt

What to do with the things you may or may not need?

1. Wash the blueberries, getting rid of unwanted stems and random alien forms getting cozy in your home. Transfer to a GIANT bowl. Resist eating. Stare longingly/lovingly. Resist eating some more.Okay have one.


2. In a separate bowl, mix the sugar (both brown and granulated), tapioca, cornstarch, cinnamon, nutmeg, and salt. Resist the urge to play with the dry mixture (Trust me, it's no fun inhaling cornstarch).


3. Add lemon juice and vanilla essence to the GIANT bowl of blueberries and mix thoroughly. Add the dry mixture to the blueberries.


4. Mix thoroughly and let sit  for 20 minutes, stirring a few times in between.


5. Preheat the oven to 425 degrees and place a rack in the center. Take a set of pie crusts and remove from the pie dish. Transfer to lightly floured surface and flatten out dents. Once the blueberry mixture is done resting, transfer to the second set of pie crusts. Cut up pieces of butter and place on top of the blueberry goodness.


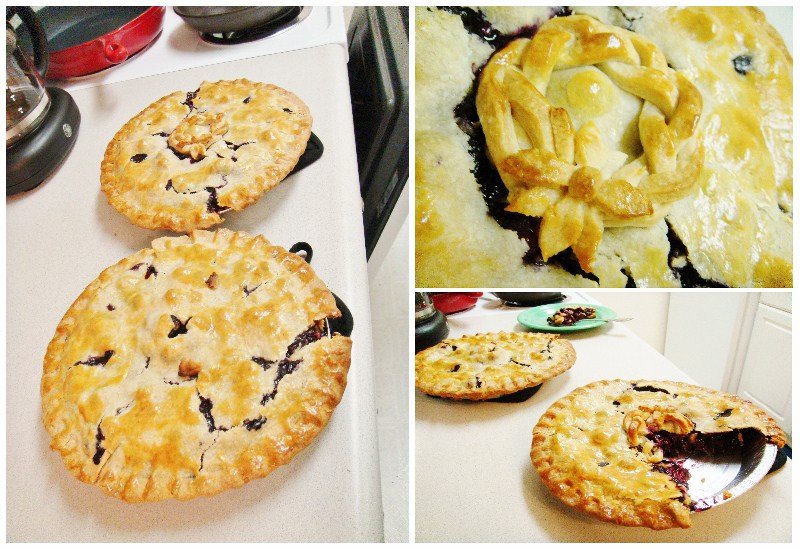
6. Take the rolled out crusts and place on top. Fold the edges under the rim of the dish and cut away any extra bits of crust. I reused the extra crust bits to make a braided loop and flower but you are under no obligation to do so. Pinch the edges to seal.

7. In a bowl whisk the egg yolk and oil. Take a brush and glaze the pies with the egg mixture. Stab the pies a few times. Take a step back and admire the piece of art you have just created.


8. Bake the pies for 10 minutes.

9. Remove from oven and turn down the temperature to 320 degrees. Cover both pies loosely with foil and return to oven. Cook for 50 minutes, remove foil, and cook for another 10 minutes. Remove from oven and let cool for 2 hours.

10. Close the blinds, find a safe spot where you will not be disturbed, and dig in. Best served consumed with double cream or ice-cream


Who says you money can't buy you happiness? Money bought me the ingredients for happiness. Fact is blueberry pie makes me very very happy.

So basically:
Money = Blueberry pie
Blueberry pie = Happiness
Therefore:
Money = Happiness


Thursday, August 11, 2011

Green Therapy!

Ever get the feeling, there is far too much paper in your life except, it isn't the green kind? No? Well didn't your mother ever tell you to share? I accept cash and/or checks. Thanks.

Now where was I? Oh right! Too much paper epidemic. So, it's a little well know secret that I have the tendency of being a bit of a nerd. This means, in class I have this uncontrollable urge to jot down every single word uttered by my professors. Generally, one might assume that such dedication should prove quite useful in the long run, however what one may forget is that by the end of semester said dedication leads to an unhealthy stack of notes.

Point is, I might have an ever growing pile of notes that is destined to someday make it to the recycling bins. But since I'm eternally lazy and forgetful, the pile of notes simply sit on my shelf, growing and growing. Some days, when I am wasting away on the couch, I see the pile and I can almost hear them cry. Or maybe that is the neighbor's kid.

Anyway, so I finally decided I wanted to address this pile before next semester, but my lazy behind really didn't want to drive to the recycling bin. So I sat on the floor, holding my notes and pondered. After fidgeting, and arguing with myself over my own laziness, I had a light bulb moment.

*Biology notes = Paper flowers*


Here is what followed:


I'd like the think the pictures are pretty self-explanatory but I know I hate not having instructions so here you are:

1. Find scary stack of papers and separate one from the pack using a pair of scissors as a weapon.
2. Keeping the scissors in sight for intimidation purposes, fold the paper in half.
3. Cut the paper in half and show it whose the boss.
4. Fold each half into half again.
5. Fold both strips into half again.
6. Repeat process to the paper's buddies till you have plenty of strips.


7. Take one strip and fold the corner diagonally.
8. Begin to roll the strip, keeping it a bit tight.
9. Apply a bit of hot glue to the strip as you continue rolling. 
10. When you reach the end of the strip, turn it over and hot glue the bejesus out of the base.
11. Take a fresh strip and hot glue it to the rolled mess. Gently fold the strip as you roll.
12. Continue rolling, gently folding, and hot gluing till it looks more like a flower.


Tip: You can add as many strips as you like. There is no such thing as too much when u have a hot glue gun and conviction. You might feel like it looks a bit wonky at first but you'll get a feel for it after awhile. 

So there you are, paper flowers from biology notes. Because the world needs more paper flowers. Because it's therapeutic watching my biology notes being recycled into something I actually kind of like. 


The End

Saturday, July 2, 2011

Post-it + Lack of will to study = Pretty consequences

Between hours of procrastinating and the rare moments when I manage to inhale oodles of information for my exams, I have moments of utter genius. This to many is heavily debatable, but in my feeble mind I have managed tasks just shy of conquering the world. The said epiphanies are heavily reliant on my need for an excuse to avoid studying.

I happened to have had multiple epiphanies in the last month (possible cause: summer semester consisting of subjects like college algebra and general biology). What started out with twitching, ripping post-its, and drinking caffeine to address my frustration with college algebra resulted in something pretty-ish.

Following is the painful tutorial for the said pretty-swirly-thingy. Excuse the poor quality of the images, I was lazy and the fancy man kept reminding me of the pile of homework that demanded to be addressed.

I used a post-it since it was small and simple. You can use any paper, as long as it's a perfect square, preferably with pretty things on both sides.

Step 1: Find yourself a square piece of paper.

Step 2 : Fold it diagonally.

Step 3: Cut slits about a quarter inch apart, making sure not to cut out the triangles entirely. I cut two triangles but you can cut as many as you want as long as you leave a little tab at the end. (I don't ever measure because I'm special like that, but if you're OCD it's an option, especially if you are working with a large piece of paper)

Step 4: Unfold and observe the pretty cut-outs followed by OOHH's and AHHH's.

Step 5: Connect the inner square with a piece of tape or a bit of glue.

 Step 6: Turn over.

 Step 7: Stick the next square ends together and turn over.

Step 8: Connect the last square ends.
 Step 9: Place on a pretty background and revel in your creation followed by more OOHH's and AHHH's.

You now have your very own pretty-swirly-thingy. You may use glitter paper and wear it as a necklace. Just sayin'. You might start a trend.